We love that our makers have so much imagination and are always pushing themselves to try new things. Stepping outside your comfort zone is the best way to learn and be innovative, and Dustin Penner from DP Makes Stuff is no exception. Dustin is constantly experimenting by marrying new and old technology to create his fun and quirky art projects that make you think. Find out how he put his personal stamp on this ‘Buy the Ticket, Take the Ride’ print blocks project to make some funky flyers using Aspire, an 112-year-old printing press, some white oak and PVC!
Dustin, thanks for making time to catch up. We always love seeing your amazing projects reveal bit by bit and what they materialize into. Tell us a bit about you, how you got started making stuff and the theatrics behind them?
I'm a father to two, husband to one and, along with our golden retriever Willow, they keep me pretty busy when I'm not working at my day job. Any time left over is spent on my creative efforts. I’ve been a maker my whole life but I got serious about it shortly after my first daughter was born. I needed a hobby that would allow me to stay close to home so making things seemed like the most useful skill. Social media, video creation, and my website were all unplanned byproducts so they came about shortly after.
You really do have a lot of skills in the mix, not just being a parent! It’s great to see your work evolved naturally into woodworking, printing and sharing photography. Which process do you enjoy most?
That’s a very tricky question! I can’t say I enjoy one more than another and I find spending time working on a different task makes me appreciate the others more. If I finish a large and complicated woodworking build, all I want to do is print. If I finish a complex print, all I want to do is make sawdust. It’s cyclical.
We agree every part of making can be infectious and we couldn’t help but notice your fantastic Edwardian printing press. It’s an amazing find and such a unique idea to bring traditional trades into your making. What was the inspiration and where did you find the press?
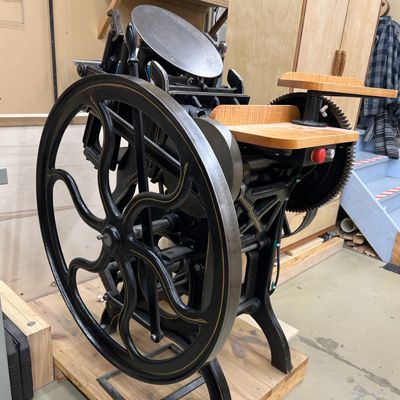
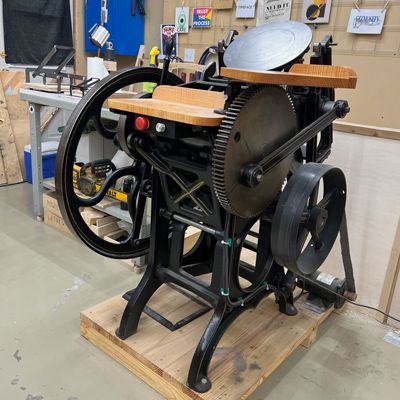
My 1911 Chandler & Price platen printing press - affectionately named Louise - is commonly referred to as the love of my life. I found Louise run down, looking rather shabby and in disrepair on a local marketplace listing. I bought her immediately and found out that she had lived a long life in Chicago before making her way up to Canada in the early 80’s**.
I wasn’t planning on restoring Louise, rather just to get her running and fix or replace the broken pieces. While I was cleaning the years of oil, dust, and loose paint off her, I discovered some gold leaf pin striping over the original black paint that had been haphazardly covered with battleship grey paint. As soon as I saw that, I knew I needed to do a full restoration.
**For our makers who love a bit of history, printing technology has been around for hundreds of years with the first complete book - commonly known as ‘the Gutenberg Bible’ being printed by Gutenberg in 1455 using a printing press and movable type. The Chandler & Price platen printer is an example of print press technology that was used for the first 500 years of printing... from circa 1450–1950. Originally developed from the George Phineas Gordon design of the 1850s, this model turned the horizontal printing surface of Gutenberg’s old flatbed screw press into a vertical plane. The new design enabled a significant increase in the number of impressions per hour (up to 1,500!), exceeded only by that of the rotary press. Chandler & Price cast iron works built over 100,000 platen presses in various different models and sizes between the 1880s and 1960s, making them the standard workhorse of smaller printing shops across North America. Louise and just a few other family members are still in use today!
We love well made tools whether they be old or new and it’s clear to see Louise was totally worth the effort to restore – she’s so mesmerizing to watch in action. Is the hand-fed press something you specifically wanted to use?
Yes I definitely wanted a hand fed printing press. Chandler & Price produced hand-fed and automated mechanisms but there is something magical about working with an 1100lb piece of cast iron that has been crafted to do one thing perfectly. But it can’t work without human input so it’s like a dance where you’re trying to keep up with machine. Listening for hints about what she needs to run, checking print quality to make sure everything is right, all the while making sure to not put your hand in the wrong place at the wrong time.
You’ve gotta love man and machine working in harmony like that, so let’s talk about the print block fitted to Louise. Can you talk us through each step of the process to make your pinstripe print blocks that she uses?
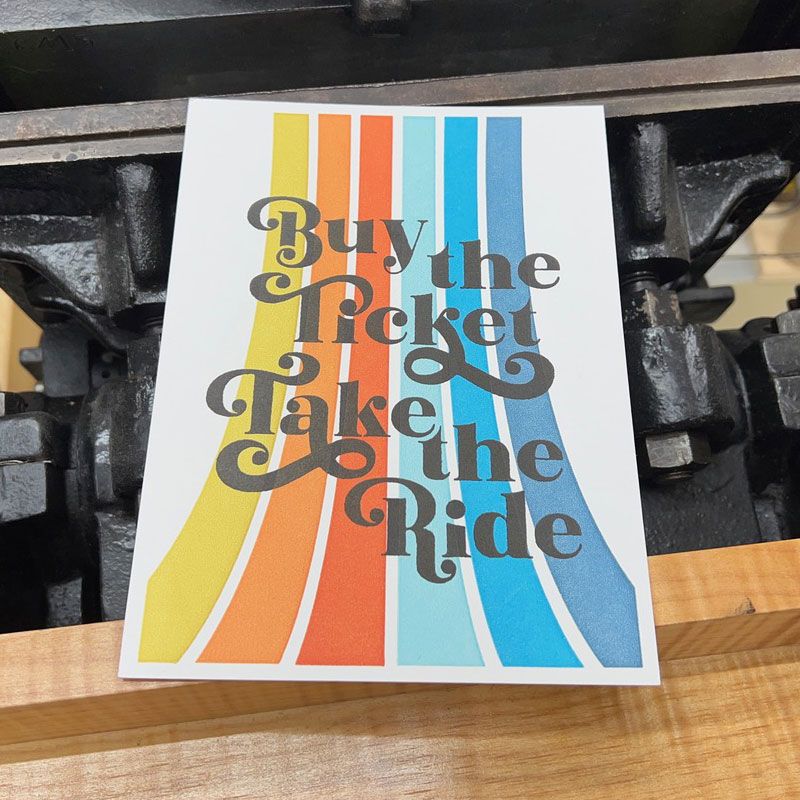
I wanted to make a print that had a 1970’s vibe to it since the quote ‘Buy the Ticket; Take the Ride’ is from Hunter S Thompson and is all about grabbing life, taking risks and sometimes being prepared to go in way over your head. Coming up with the pinstripe concept, I had seen each of the two-color schemes separately and combined them on a whim. I really liked the result so I came up with a design that fit the paper.
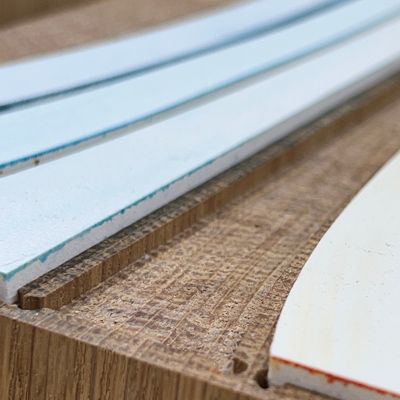
The pinstripe is so inspired and the colors really pop! What made you choose the PVC?
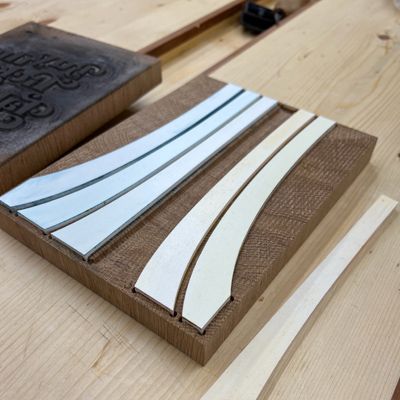
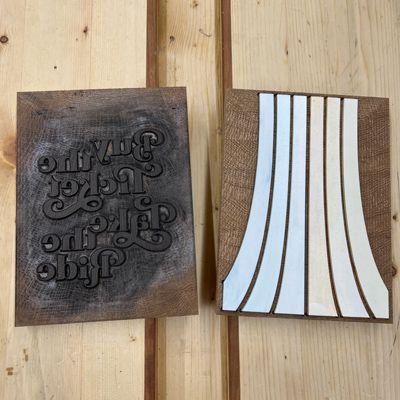
A friend of mine sent me a piece of expanded PVC Sintra to try since he had heard it worked well for printing. I used it on a previous single-colour print and it did work quite well. It holds onto ink, is hard enough not to deform, is a consistent thickness, and is relatively cheap to buy.
That’s a really interesting choice and super cool combo with the white oak and maple. How did you create the wood blocks?
My recipe for success with print blocks is a 1/4” down-cut bit for clearing and a 60 degree v-carve bit for detail. Any end grain hardwood will do the job but I’ve found maple gives me the best results. For the ‘Take the Ride’ print, I used end grain white oak and the grain actually shows through on the black text. I like that detail but a proper printer might disagree. Choosing the colors, ink and printing order: It’s amazing dedication to stand over the job for 7 hours to get the 6 colors down! And you’re right, the pinstripes really do pop!
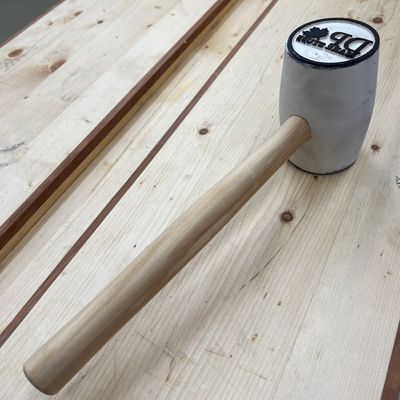
We absolutely love the stamp hammer seal for the envelope finishing. Such fun to watch. How did you create it?
The stammer! That is all-around a bad idea and I don’t recommend it. It does a great job but it’s more a hammer than a stamp. If you don't have a solid wood bench to hammer on, you will absolutely destroy whatever you hammer on. I destroyed my outfield table before learning that lesson. It wasn’t too hard to make; I just mounted a rubber mallet to the CNC bed and carved it out.
That’s made us chuckle but then if you don’t experiment, who’s going to find out what works! You must find that process really fun and rewarding. What other tools to do you have to help your makery?
I do furniture design using Fusion 360 then all my design work is done in Adobe Illustrator, and all CAM work is done with Aspire. I have a pretty basic CNC setup, it’s just an X-Carve that I cut down to fit my space a little better.
Do you have any tips for makers getting into printing, and especially people trying to use heritage machines?
Printing has been around for nearly 600 years and it’s been well documented. If you start reading books on the art of printing, you’ll quickly discover that there is more than one way to skin a cat. If the ink is getting on the paper and conveying your message, you’re doing it right. My advice would be to do what makes sense to you, always be learning, and don’t be immune to good advice. Oh, and keep your fingers clear of places they shouldn’t be… old machines bite!
You have certainly inspired us to start looking into print art and combining old and new tech. Is there anything you have adapted or done differently in Aspire since producing your first project?
Oh yes! Prior to using Vectric software I was reluctant to do tool changes. There was way too much room for error in the other software I had used. Being able to group tool paths based on the tool and export them as one has simplified to process for me. I save so much time machining now that I’m not afraid of changing tools. Every time I use Vectric Aspire to create toolpaths, it just blows me away. If you've got a CNC router and you move beyond basic toolpaths - especially if you're doing VCarve work - I recommend giving it a try.
That’s fantastic to know you have more confidence using Aspire’s multi sheets and layers to sort your toolpaths and automate the tool changing process. Can you give us a sneak peak of what’s next on your projects planned?
My next big printing project won’t be on paper. I hope to make printing more accessible to everyone and not everyone has room for their own Louise, so watch this space!
Big thanks to Dustin for sharing his behind-the-scenes tour of this amazing printing press project. To find out how to use your CNC to make tools for artistic projects like these pinstripe print blocks or gen up on more of Dustin’s cool work, check out the project gallery then head over to Dustin’s socials channels or website.
YouTube: https://www.youtube.com/channel/UCi5vt68L_LY7SWnZeO1ky0w
Instagram: https://www.instagram.com/dpmakestuff/
Website: https://www.dpmakestuff.com


Vectric Ltd
Precision House
2 Arden Road
Alcester
B49 6HN
Registered in England Number 05382596
VAT Registration GB115123072
Privacy Policy |
Cookie Policy |
Terms and Conditions


