A few months back I had an opportunity to spend a bit of time in the Vectric Lab with James Booth. If you have ever been to the lab before it is like Vectric’s version of Santa’s workshop. It’s filled with all kinds of tools and technology to work with. At first glance you can’t help but miss the CNC machine right in the centre of the room.
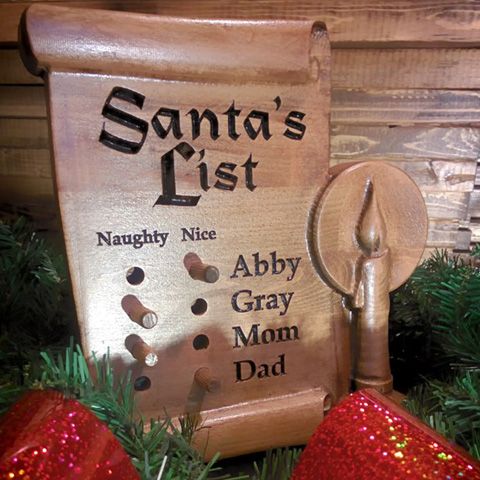
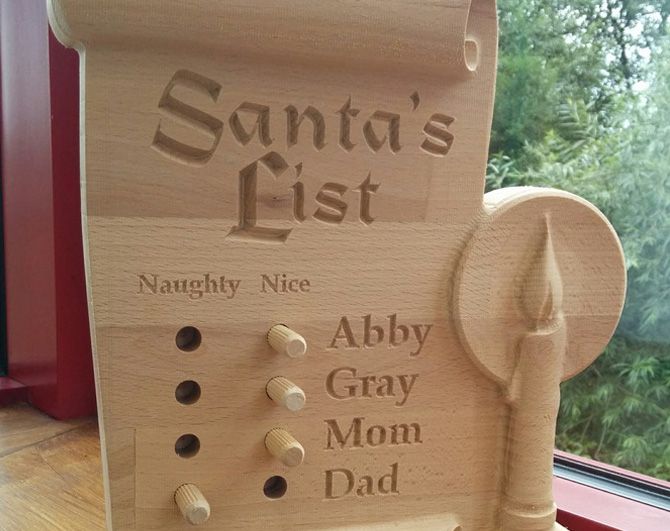
We only had a short time to get a project planned and CNC’ed before it was time for me to leave so I decided to use a hack from the past as inspiration for the project. The Santa’s List hack (Hack of the Week No.28) was one that I have always felt would be a fun project to have on display during the holidays. The idea is to have an interactive decoration that could be easily customized to have the names of the kids, parents, grandparents or even pets and a way of showing if they are on the Naughty or Nice list. Making use of a dowel to indicate how the past year has gone would be perfect and could change from day to day depending on who is making the decision.
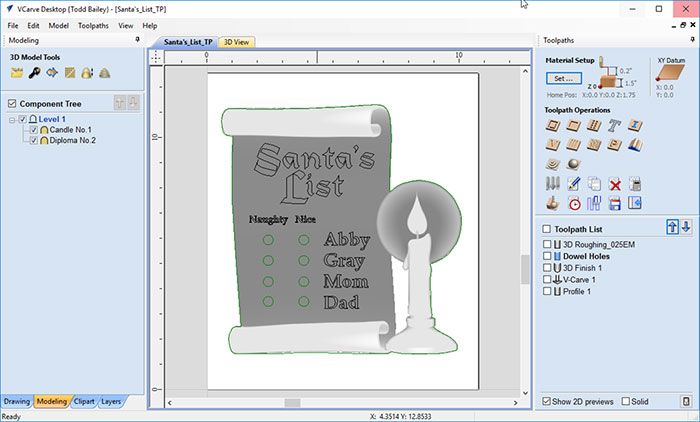
I used Vectric’s V-Carve Desktop to create the 11” x 13” layout. This hack only uses two models from two different projects so it took just a few minutes to get right.
The font was a bit tricky seeing as it had vector loops on some of the sharp points. Using the “Interactive Vector Trim” tool I was able to remove these. Once I had it looking the way I wanted, including the text and dowel hole placement, we went on the hunt for a piece of material to make it in.
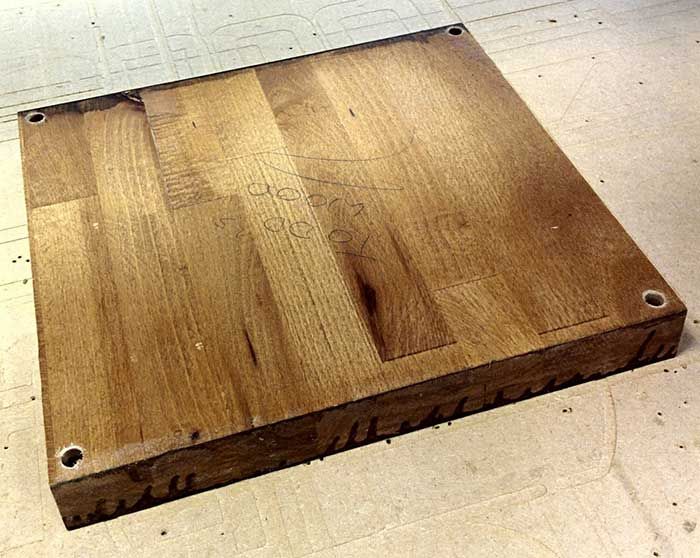
After digging through a pile of wood we found a piece of butcher’s block that we thought would look great up-cycled into a holiday decoration. We took a few measurements and then screwed it to the waste board on the CNC.
It was time to get the tooling created. This project would take 5 toolpaths using 3 different tools, so that meant 3 tool changes would need to happen.
You might have noticed we did the dowel holes before the finishing pass. This was done on purpose so any rough edges left from making the holes would be removed during the finishing pass. We made sure to test fit the dowels before we moved on to finishing just in case we needed to make any last second adjustments. The dowels needed to fit in and out easily so tiny Elf fingers could move them around without making a noise.
Of course we previewed all of the tooling before we sent it to the machine to make sure it looked OK and we knew what to expect while the CNC was working.
All of the tooling came out just as we expected, and yes, we did need to adjust the dowel holes to fit. After all was said and done the project took just under 2 hours to complete on the CNC.
I added about 30 minutes to that time in sanding and finishing. It would be good to keep in mind that if we chose to use a 1/8” Ball Nose End Mill for the finishing it would have added another 45min to the machining time but saved us a bit of time when I was prepping for the stain.
This particular layout really needed to have the letters darker than the rest of the piece. Instead of painting the lettering I decided to use a gel stain and do my best to leave the stain in the recesses and leave a shadow between the candle and the scroll.
This project would be a good start for those new to V-Carve Desktop or even the seasoned Aspire user!
In the end I am pretty happy with the finish and my kids are enjoying swapping the pegs and seeing if I notice! Mission accomplished!
Vectric Ltd
Precision House
2 Arden Road
Alcester
B49 6HN
Registered in England Number 05382596
VAT Registration GB115123072
Privacy Policy |
Cookie Policy |
Terms and Conditions


