After a busy year, it was nice to get back into the Lab and have time to make something!
We’re now past the half way point of November so it’s a little difficult to avoid Christmas. Stores are filled with Christmas decorations, every other advert we see on the TV is telling us to buy the latest gizmo and we’re all pretty much gearing ourselves up for this fun (manic) time of year.
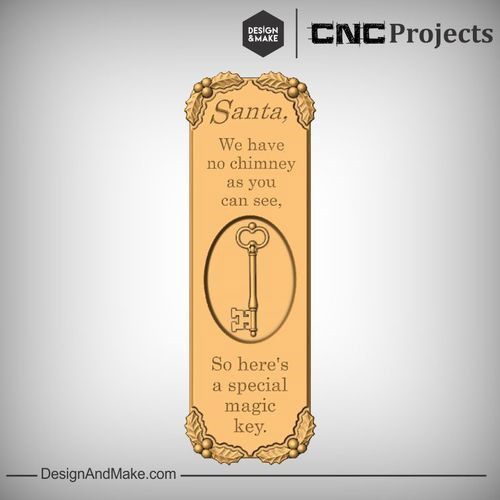
I was looking at Design and Make’s latest project Home for the Holidays No.5 which you can find here http://designandmake.com/home-for-the-holidays-no5 and I was inspired by the Hack suggestion for the project.
Which made me think about when I was young, I grew up in a house with no chimney and every year I would ask (for reassurance) “Mom, how is Santa going to deliver our presents when we don’t have a chimney?” To which she always told me “Santa has a magic key” … as a kid I just believed it and low and behold old Saint Nick managed to deliver our presents.
Now as an adult, I still have no chimney so I thought I could make a decoration using this idea and some of Design and Make’s clip art! I took to Pinterest first (this is a GREAT way to find inspiration!) for further ideas and found various signs about Santa and his magic key and then I knew what I wanted to do.
Using the “Mold Board No.1” clip art from the Home for the Holidays No.5 project as the main base for my sign I bought that into Aspire (you can use D&M Projects in VCarve too!) and I input some text ready to VCarve “Santa’s Magic Key For Our Home With No Chimney”.
Let’s talk toolpaths! Now rather than applying a basic 3D Roughing/Finishing and a cut out toolpath I thought I could get the part cut a lot quicker and more efficiently by limiting the 3D toolpaths only to the 3D elements of the sign... make’s sense really, so the flat part of the sign I pocketed out using a 0.5” EM and that didn’t take much time at all!
Then I simply ran a VCarve Toolpath on the flat surface to create the text using a 60° 0.5” V-Bit. Last toolpath was a simple cut out with tabs to cut the part out.
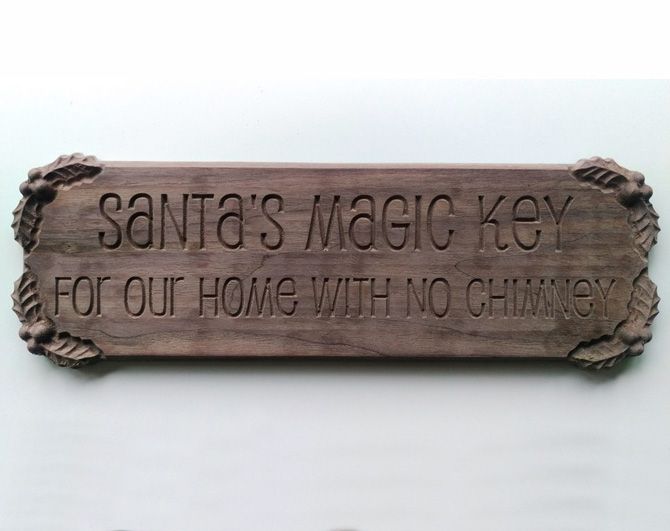
So over to the machine.. I found a nice piece of walnut and thought this would be perfect as I was going for a Nordic rustic look. I set up the material on the machine and cut the plaque out:
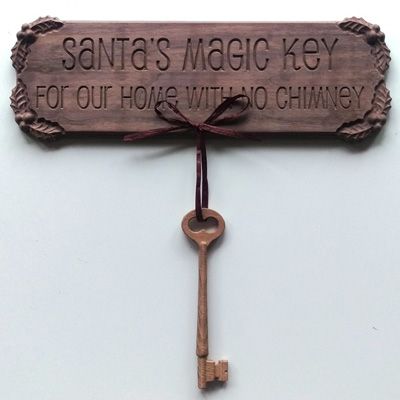
I’m pretty happy with the finished part! However I think it would’ve helped if I included hanging holes on the back of the sign before I cut this out to hang the sign up, as I didn’t want to detract from the plaque itself having drill holes running through the front (I think aesthetically that would have looked displeasing ... but that’s just my own opinion) But it could work as a free standing leaning sign... right?
Now what about that key? As I said I was originally inspired by Design & Make’s Hack for Home for the Holidays 5 project ... now rather than cut the key out in relief form, I wanted to make a full 3D key that would hang below the sign. So I looked through all of the D&M projects for a key that I could cut both sides to create a full 3D real key.
I found a nice vintage looking key in the Family Coat of Arms Achievement Pack No.2 (http://designandmake.com/family-coat-of-arms-achievement-pack-no2/)
So I used this and imported the key into a session of Aspire (again all D&M projects work in VCarve too!) and I created the two sides using the symmetrical dowel method (for more info on two sided machining there are various tutorials to help you, in particular I would take a look at the Two sided leaf bowl which shows this method in the software and practically on the machine bed http://support.vectric.com/tutorials/V8/LeafBowl/LeafBowl_3DAS.html &
http://support.vectric.com/tutorials/V8/LeafBowl/LeafBowl_PRAC.html)
I cut the key both sides and all was good, until I gave it a little sand where the tabs were, I managed to break the key. Now the key survived machining but the handle area of the key was rather thin (where it has had the fatal accident occur) and the grain could not cope with this, so now I knew I needed a thicker/bigger key.
No bother though... I went back and looked for other keys available that I thought would be thick enough to work with at a length of 5 inches... I found the perfect key which is actually from Design and Make’s getting started project and what’s even better about this project is that it’s FREE! http://designandmake.com/getting-started-guide/
So I set up a new file and cut the key out. Perfect. I gave it a little sanding and added a ribbon to finish it off.
Here is how I envision the finished sign, all I need is a little nail to hang the key from.
Now this is something that in hindsight I would go back and change the file to accommodate, maybe modify one of the dish’s in the free clipart that comes with the software using the component properties form (by adding base height and increasing the shape height) to create a hanging element within the design. As I mentioned earlier I’d add the hanging holes on the back of the sign too... well there’s some food for thought and hopefully a little bit of Christmas inspiration for your own homes without chimneys!
Vectric Ltd
Precision House
2 Arden Road
Alcester
B49 6HN
Registered in England Number 05382596
VAT Registration GB115123072
Privacy Policy |
Cookie Policy |
Terms and Conditions


