Having a beer opener on the wall comes in handy, however there is nothing worse than the cap falling on the floor when you open it. OK that’s actually not that bad… however it would be much better if instead of succumbing to gravity it stuck to the wall until your ready to throw it away.
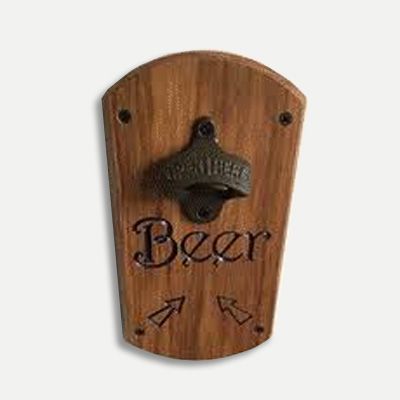
Thanks to the power of magic beans magnets this little beauty will do just that. Just grab your favourite bottled brew, open and amaze your friends as the cap handily sticks to the back-plate (in this design where the arrows point). Read on to learn more about how I made my version, download the files to make your own in VCarve or Aspire and also see a nice slo-motion video of the opener in action… This does also work for other bottled beverages not just beer (I assume).
A few months ago I came across a version of this on the web that had been made using regular tools (apologies for not remembering where the original inspiration came from – although there are many versions out there). At the time I thought that it was a perfect ‘quick’ project for a CNC and so added it to my ever growing to-do list. In anticipation though I did go onto ebay and find a suitable beer opener and magnets and ordered 5 openers and 10 magnets as I assumed that once people see it I’d end up making a number of them! Links to the ones I bought from the ebay site in the UK are listed below – they are surprisingly cheap! This is not intended as a specific recommendation, please research and source your own – they do seem to work OK in my version though: Link to Beer Openers - Link to Magnets
Last week I finally managed to put aside some time to cut what I thought would be a prototype but that actually ended up working perfectly.
I cut this as a two sided project, the back just had the location holes for the dowels a pocket for the magnet and a shallow profile cut to try to reduce the chance of the edge of the material tearing up when it was cut through from the front. This was all cut with a 0.25” end mill. Once machined we took the material off the bed.
The front side has the dowel positions which were machined into the spoil board. Then the part was put back on the table using the dowels to locate it. The first toolpath on the material on this side cut the location holes for the mounting screws for the opener and also where it was going to be attached to the wall with a 90 degree v-bit – this gave the positions and for the wall holes also created a counter-sink. The actual holes were drilled with a normal hand-drill after the CNC operations. At the same time as cutting the location holes I used the 90 degree tool to cut the lettering and arrows into the front and also bevel the edge of the part. Finally it was cut-out with a 0.25” end mill.
The magnet was put into the hole on the back-side and the beer opener was fitted, at this stage I took it home and while getting someone to hold it against the wall I used a test beer to make sure it was working correctly, it worked perfectly but just to make sure we tried a couple of others… Once we’d established it functioned as desired I figured I may as well go ahead and finish off the prototype and install it.
To finish I used several coats of shellac to seal the part, lightly sanding in between each one. Once I thought it was well sealed I painted the letters with some blue modelling enamel paint. I did a couple of coats trying to not go over the edge too much but also not worrying about it particularly. Between each coat I wiped the worst of the excess off. Once it was dry I sanded off the paint on the flat surface of the top which had gone over the edge of the letters (the shellac stops this from penetrating the wood). Then I added a couple more coats of shellac to finish. I decided not do anymore at this stage but if this finish does not last well then I can easily remove the beer opener and use something more durable.
Follow the link to watch the Beer Cap Catcher in action (apologies for small loss of beer incurred during the making of this video).
The links to download the files I used to cut my version of this are below. They will work in VCarve Desktop, VCarve Pro or Aspire 8.5 or higher. As with any project you should ensure you recalculate all toolpaths with appropriate values and settings for your tooling, material and CNC.
Suitable for version 8 or greater
Login to V&Co to download the files
LoginPlease access this page on a desktop computer to download the files
Vectric Ltd
Precision House
2 Arden Road
Alcester
B49 6HN
Registered in England Number 05382596
VAT Registration GB115123072
Privacy Policy |
Cookie Policy |
Terms and Conditions


